"Deploying Applications with Kubernetes Workloads: A Comprehensive Overview of Deployments, StatefulSets, DaemonSets, Jobs and CronJobs"


Workloads
A workload is an application running on Kubernetes. Whether your workload is a single component or several that work together, on Kubernetes you run it inside a set of pods. In Kubernetes, a Pod represents a set of running containers on your cluster.
To make life considerably easier, you don't need to manage each Pod directly. Instead, you can use workload resources that manage a set of pods on your behalf. These resources configure controllers that make sure the right number of the right kind of pod are running, to match the state you specified.
Deployments
Deployment and ReplicaSet
Deployment is a good fit for managing a stateless application workload on your cluster, where any Pod in the Deployment is interchangeable and can be replaced if needed.

Deployment in Kubernetes is a controller which helps your applications reach the desired state, the desired state is defined inside the deployment file.
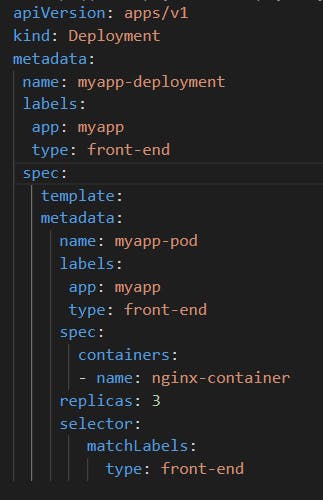
YAML Syntax for deployment
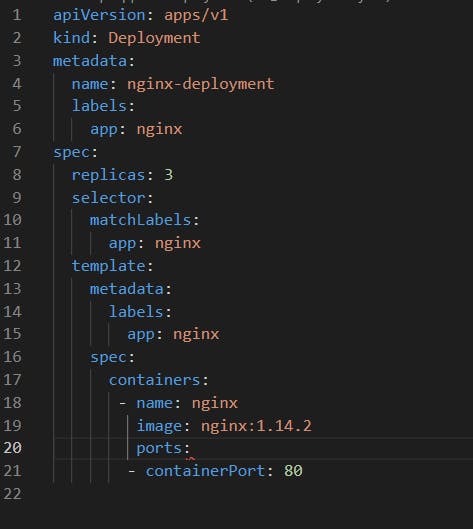
Once the file is created, to deploy this deployment use the following syntax
kubectl create –f deployment.yml
Then run the kubectl get deployments command to see the newly created deployment
kubectl get deployments
The deployment automatically creates a replica set. So if you run the kubectl get replicaset command you will be able to see a new replicaset in the name of the deployment
kubeectl get replicaset
The replicasets ultimately create pods, so if you run the kubectl get pods command you will be able to see the pods with the name of the deployment and the replicaset
kubectl get pods
Updates and rollbacks in a Deployment
Before we delve into the process of upgrading our application, it's important to have a clear understanding of Rollouts and Versioning in deployment.
Each time you create a new deployment or upgrade the images in an existing deployment Rollout is triggered. This Rollout is the gradual process of deploying or upgrading the application containers. The initial deployment triggers the first Rollout, which creates a new Deployment revision known as Revision 1.
Whenever there is an upgrade to the application - which involves updating the container version to a newer one - a new Rollout is initiated, and a new Deployment revision is created, referred to as Revision 2.
By using this Revision control approach, we can monitor the changes made to our deployment and, if needed, revert to a previous version of the deployment.
You can see the status of your rollout by running the command
kubectl rollout status nameofdeployment
To see the revisions and history of rollout
kubectl rollout history nameofdeploment
Deployment strategies
There are two types of deployment strategies
1. Recreate strategy

One way to upgrade these to a newer version is to destroy all of these and then create newer versions of application instances.
Meaning first, destroy the 6 running instances and then deploy 6 new instances of the new application version.

The problem with this as you can imagine, is that during the period after the older versions are down and before any newer version is up, the application is down and inaccessible to users.
All pods destroy and recreate with new version.
This strategy is known as the Recreate strategy.
2. Rolling Update

The second strategy is that we do not destroy all of them at once. Instead, we take down the older version and bring up a newer version one by one.This way the application never goes down and the upgrade is seamless.
If you do not specify a strategy while creating the deployment, it will assume it to be Rolling Update. In other words Rolling Update is the default Deployment Strategy.
We have a deployment definition file it is easy for us to modify this file. Once we make the necessary changes, we run the Kubectl apply the command to apply the changes. A new rollout is triggered and a new revision of the deployment is created.
Once we make the necessary changes, we run the Kubectl apply command to apply the changes.
kubectl apply –f deployment-definition.yml
A new rollout is triggered and a new revision of the deployment is created.
The difference between the recreate and rollingupdate strategies
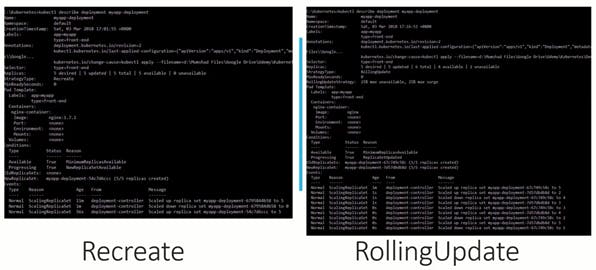
Run the kubectl describe deployment command to see detailed information regarding the deployments.
You will notice when the Recreate strategy was used the events indicate that the old replica set was scaled down to 0 first and the new replica set scaled up to 5.
However, when the RollingUpdate strategy was used the old replica set was scaled down one at a time simultaneously scaling up the new replica set one at a time.
Upgrades
When you upgrade your application, the Kubernetes deployment object creates a NEW replicaset under the hoods and starts deploying the containers there. At the same time taking down the PODs in the old replica set following a RollingUpdate strategy.
This can be seen when you try to list the replicasets using the kubectl get replicasets command
kubectl get replicasets
Rollback
Kubernetes deployments allow you to rollback to a previous revision. To undo a change run the command kubectl rollout undo followed by the name of the deployment.
kubectl rollout undo deployment/myapp-deployment
The deployment will then destroy the PODs in the new replicaset and bring the older ones up in the old replicaset. And your application is back to its older format.
StatefulSet
StatefulSet is the workload API object used to manage stateful applications.
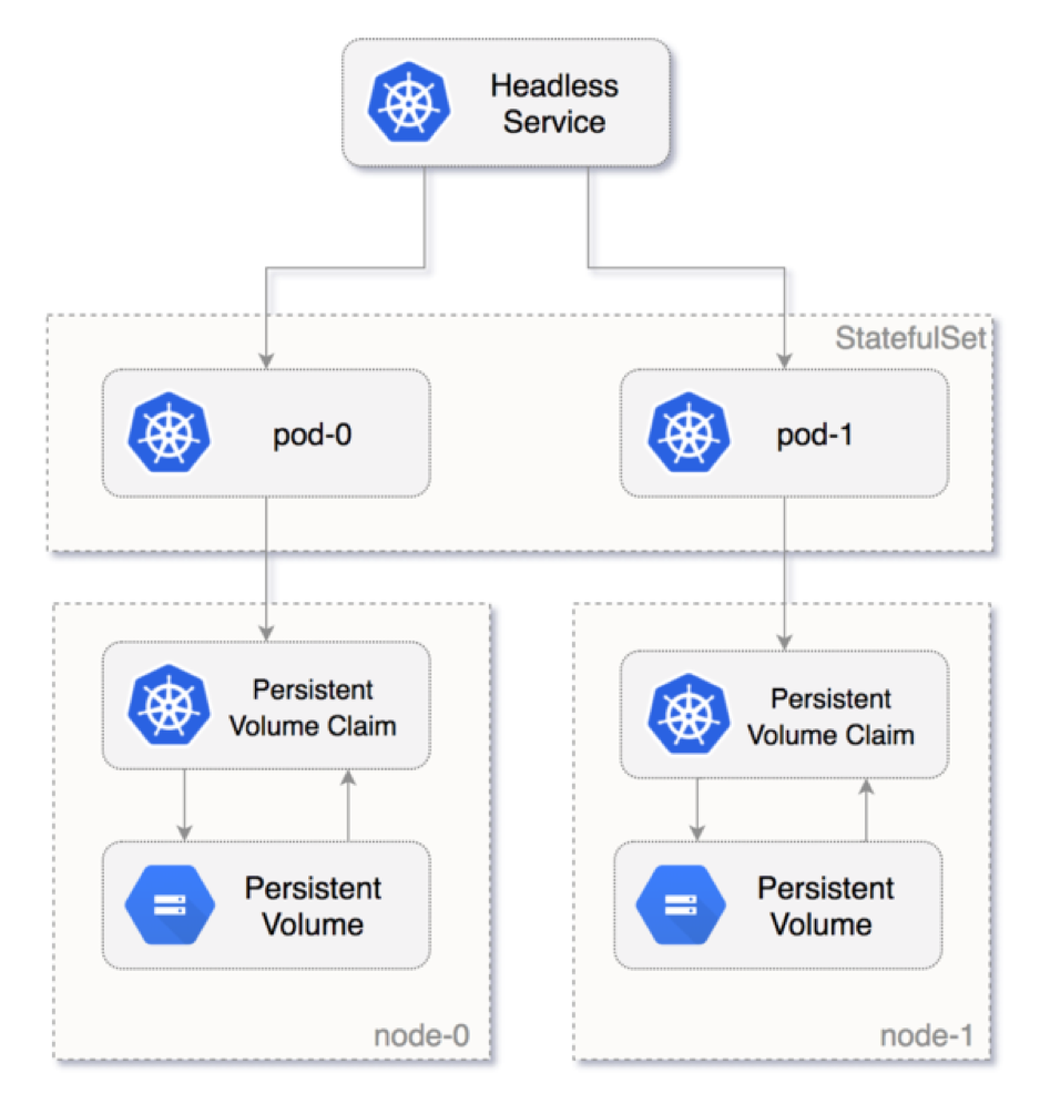
A StatefulSet maintains a sticky identity for each of its Pods. These pods are created from the same spec, but are not interchangeable: each has a persistent identifier that it maintains across any rescheduling.
If you want to use storage volumes to provide persistence for your workload, you can use a StatefulSet as part of the solution.
The diagram below shows how the Pod is numbered from zero and how Kubernetes persistent volume is attached to the Pod in the StatefulSets.
What Are Stateful Applications?
Stateful applications refer to applications that retain and update data. Databases like MySQL, Oracle, and PostgreSQL are examples of stateful applications.
Stateless applications, on the other hand, do not store data and process new data for every request they receive. Node.js and Nginx are examples of stateless applications.
In a contemporary web application, stateless applications like Node.js interact with stateful applications such as MySQL databases to fulfill user requests. Node.js processes new data for every request and then connects with the MySQL database to store and update data.
When to Use StatefulSets
There are several reasons to consider using StatefulSets. Here are two examples:
Assume you deployed a MySQL database in the Kubernetes cluster and scaled this to three replicas, and a frontend application wants to access the MySQL cluster to read and write data. The read request will be forwarded to three Pods. However, the write request will only be forwarded to the first (primary) Pod, and the data will be synced with the other Pods. You can achieve this by using StatefulSets.
Deleting or scaling down a StatefulSet will not delete the volumes associated with the stateful application. This gives you your data safety. If you delete the MySQL Pod or if the MySQL Pod restarts, you can have access to the data in the same volume.
Creating StatefulSets
To create a StatefulSet, you need to define a manifest in YAML and create the StatefulSet in your cluster using kubectl apply.
After you create a StatefulSet, it continuously monitors the cluster and makes sure that the specified number of pods are running and available.
When a StatefulSet detects a pod that failed or was evicted from its node, it automatically deploys a new node with the same unique ID, connected to the same persistent storage, and with the same configuration as the original pod (for example, resource requests and limits). This ensures that clients who were previously served by the failed pod can resume their transactions.
The following example describes a manifest file for a StatefulSet. It was shared by Google Cloud. Typically, a StatefulSet is defined together with a Service object, which receives traffic and forwards it to the StatefulSet.
apiVersion: apps/v1
kind: StatefulSet
metadata:
  name: web
spec:
  selector:
    matchLabels:
      app: nginx
  serviceName: "nginx"
  replicas: 3
  template:
    metadata:
      labels:
        app: nginx
    spec:
      terminationGracePeriodSeconds: 10
      containers:
      - name: nginx
        image: k8s.gcr.io/nginx-slim:0.8
        ports:
        - containerPort: 80
          name: web
        volumeMounts:
        - name: www
          mountPath: /usr/share/nginx/html
      volumes:
      - name: www
        persistentVolumeClaim:
          claimName: www
  volumeClaimTemplates:
  - metadata:
      name: www
    spec:
      accessModes: ["ReadWriteOnce"]
      resources:
        requests:
          storage: 1Gi
A few important points about the StatefulSet manifest:
The code above creates a StatefulSet called
web, containing three pods running an NGINX container image.The
specs.selector.matchLabels.appfield must match thetemplate.metadata.labelsfield (both are set to app: nginx). This ensures that the StatefulSet can correctly identify containers it is managing.The pod exposes the
webport defined as port 80.volumeClaimTemplatesprovides storage using a PersistentVolumeClaim calledwww. This requests a storage volume that enablesReadWriteOnceaccess and has 1GB of storage.A mount path is specified by
template.spec.volumeMountsand is calledwww. This path indicates that storage volumes should be mounted in the/usr/share/nginx/htmlfolder within the container.
DaemonSet
A DaemonSet ensures that all (or some) Nodes run a copy of a Pod. As nodes are added to the cluster, Pods are added to them. As nodes are removed from the cluster, those Pods are garbage collected. Deleting a DaemonSet will clean up the Pods it created.
Why use DaemonSets?
Cluster Log Collection: Running a log collector on every node to centralize Kubernetes logging data. Eg: fluentd , logstash, fluentbit
Cluster Monitoring: Deploy monitoring agents, such as Prometheus Node Exporter, on every node in the cluster to collect and expose node-level metrics. This way prometheus gets all the required worker node metrics.
Security and Compliance: Running CIS Benchmarks on every node using tools like kube-bench. Also deploy security agents, such as intrusion detection systems or vulnerability scanners, on specific nodes that require additional security measures. For example, nodes that handle PCI, and PII-compliant data.
Storage Provisioning: Running a storage plugin on every node to provide a shared storage system to the entire cluster.
Network Management: Running a network plugin or firewall on every node to ensure consistent network policy enforcement. For example, the Calico CNI plugin runs as Daemonset on all the nodes.
Create a DaemonSet
Like other Kubernetes objects, DaemonSet also gets configured by using YAML files. We need to create a manifest file that will contain all of the necessary configuration information for our DaemonSet.
Let’s assume we want to deploy a fluentd logging agent as a Deamonset on all the cluster worker nodes.
Below is a sample daemonset.yaml file that gets deployed in the logging namespace.
apiVersion: apps/v1
kind: DaemonSet
metadata:
  name: fluentd
  namespace: logging
  labels:
    app: fluentd-logging
spec:
  selector:
    matchLabels:
      name: fluentd
  template:
    metadata:
      labels:
        name: fluentd
    spec:
      containers:
      - name: fluentd-elasticsearch
        image: quay.io/fluentd_elasticsearch/fluentd:v2.5.2
        resources:
          limits:
            memory: 200Mi
          requests:
            cpu: 100m
            memory: 200Mi
        volumeMounts:
        - name: varlog
          mountPath: /var/log
      terminationGracePeriodSeconds: 30
      volumes:
      - name: varlog
        hostPath:
          path: /var/log
Let’s understand the manifest file.
apiVersion:apps/v1forDaemonSetkind:DaemonSetsuch as Pod, Deployment, and Servicemetadata:Put the name of theDaemonSet, mention namespace, annotations, and labels. In our caseDaemonSet'sname is fluentd.spec.selector:The selector for the pods is managed by theDaemonSet. This value must be a label specified in the pod template. This value is immutable.spec.template:This is a required field that specifies a pod template for theDaemonSetto use. Along with all the required fields for containers. It has everything of pod schema exceptapiVersionandkind.
template.metadata will have the details about the pod and template.spec will have the schema of the pod.
Here in the pod template, we are using quay.io/fluentd_elasticsearch/fluentd:v2.5.2 image that will run on every node in a Kubernetes cluster. Each pod would then collect logs and send the data to ElasticSearch. Added resource limit and request for the pod, also volume and volumeMount accordingly.
We don’t provide any replica counts, It is because the replicas count of DaemonSet is dynamic in nature as it depends on the node count of the cluster.
Let’s deploy this manifest by using the below commands. First we will have to create a namespace and deploy the daemonset in that namespace.
kubectl create ns logging
kubectl apply -f daemonset.yaml
Check the DaemonSet status and pods’ status.
kubectl get daemonset -n logging
kubectl get pods -n logging -o wide
You can see fluentd pods are running on the two available worker nodes.
Here are some other useful commands to describe, edit and get the DaemonSet.
kubectl describe daemonset -n logging
kubectl edit daemonset -n logging
#shortcut for daemonset is ds
kubectl get ds
Jobs and CronJobs
Jobs
A Job in Kubernetes is a resource that creates one or more pods and ensures that a specified number of them are complete. Jobs are useful for running batch workloads that are not expected to run continuously. Examples of such workloads include data processing tasks, backups, and data migration.
The job is designed for parallel processing of independent but related work items like sending emails, rendering frames, transcoding files, scanning database keys, etc...
Here is the manifest for a Job:
---
apiVersion: batch/v1
kind: Job
metadata:
  name: example-job
spec:
  template:
    metadata:
      name: example-job
    spec:
      containers:
        -
          args:
            - "-Mbignum=bpi"
            - "-wle"
            - "print bpi(2000)"
          command:
            - perl
          image: perl
          name: pi
      restartPolicy: Never
Create a Job:
kubectl apply -f example-job.yamljob.batch "example-job" created
Display your jobs:
kubectl get jobs
Get details of a job:
kubectl describe job example-job
Edit a job:
kubectl edit job example-job
Delete a job:
kubectl delete job example-job
CronJobs
A CronJob is similar to a Job, but it allows you to schedule the execution of a task at regular intervals or specific times. With CronJobs, you can specify a schedule using the standard cron syntax, and Kubernetes will create and manage pods to run the scheduled task.
Here is the manifest for Cronjob
---
apiVersion: batch/v1beta1
kind: CronJob
metadata:
  name: hello
spec:
  jobTemplate:
    spec:
      template:
        spec:
          containers:
            -
              args:
                - /bin/sh
                - "-c"
                - "date; echo Hello from the Kubernetes cluster"
              image: busybox
              name: hello
          restartPolicy: OnFailure
  schedule: "*/1 * * * *"
Create a Cron Job:
kubectl create -f cronjob.yaml
cronjob.batch “hello” created
Get details of a cronjob:
kubectl describe cronjob hello
Edit a cronjob:
kubectl edit cronjob hello
Delete a cronjob:
kubectl delete cronjob hello
Both Jobs and CronJobs are useful for running one-time or periodic tasks on Kubernetes clusters. They provide a way to manage batch workloads in a reliable and scalable way, ensuring that your workloads run to completion and do not interfere with other workloads on the cluster.
Connect me on
LinkedIn: https://www.linkedin.com/in/aditya-tak/
Hashnod: https://hashnode.com/Aditya Jagdish Tak
#Kubernetes #Devops #Kubeweek #kubeweekchallenge
Resources:
https://kubernetes.io/docs/concepts/workloads/controllers/statefulset/
https://devopscube.com/kubernetes-daemonset/
https://kubernetes.io/docs/concepts/workloads/controllers/daemonset/
https://medium.com/avmconsulting-blog/jobs-cronjobs-in-kubernetes-cluster-d0e872e3c8c8
https://kubernetes.io/docs/concepts/workloads/controllers/job/