Kubernetes Architecture and Components, Kubernetes Installation and Configuration
Kubernetes is an open-source container orchestration system for automating software deployment, scaling, and management. Google originally designed Kubernetes, but the Cloud Native Computing Foundation now maintains the project.
K8s Offers four fundamental advantages over docker.
K8s is a cluster in nature
Auto healing
Autoscaling
Multiple Enterprise level support.
Kubernetes Architecture:
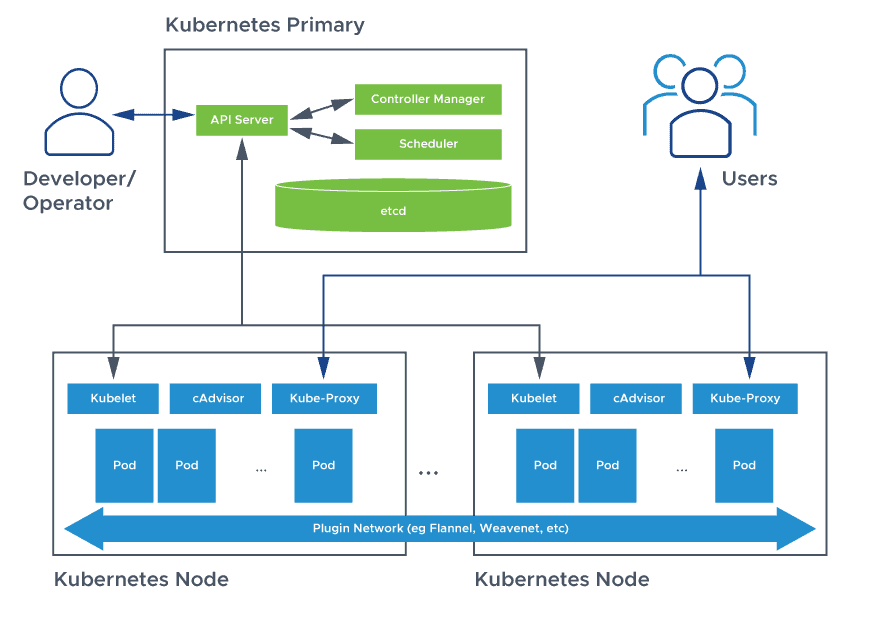
There are two main components in k8s architecture
1)Control Plane also called Master, Primary
2)Data plane also called Node
🔹Kubernetes Master
The control plane has 5 components.
i)API server ii) etcd iii)Scheduler iv)Control Manager v)Cloud-controller-manager
i)API server:
It is the heart of K8s.
The API server is responsible for handling the API is talking to the end users.
ii)etcd:
It is a key-value store & entire k8s cluster information is stored as Objects.
Without etcd we don't have cluster-related information
iii)Scheduler:
The scheduler is responsible for scheduling the resources or pods on the Kubernetes cluster.
It receives information from the API server.
API server decides on information and the scheduler acts on the information.
iv) Control Manager:
In k8s there has to be a component that ensures Controllers (Replica-set) are always running so that component is called a controller manager.
v)Cloud-controller-manager:
This component embeds cloud-specific logic
\==This is about the control plane or the master load components of Kubernetes==
🔹Kubernetes Node
We have the data plane where you have four primary components
i)kubelet ii)Kubeproxy iii)container runtime iv)CAdvisor
i)Kubelet = It is responsible for managing the pods. Let’s say if the pod is running in a healthy state or not a pod has to be restarted if the Pod has gone down then Kubelet takes care of starting the Pod so Kubelet is a component that is responsible for managing the pods on the nodes.
ii)Kubeproxy = It is a networking component of Kubernetes that typically takes care of updating the IP tables. for example, you create a service of type node Port so what under the hood happens is the Kubeproxy is the one that understands that okay there is a service that is created of type node Port so I have to go ahead and update the IP tables in such a way that somebody accesses the node IP address call on a specific Port the request has to be sent to the Pod so Kubeproxy is the one that takes care of the networking.
iii)container runtime: Kubernetes supports container run times such as contained, CRI-O and any implementation of Kubernetes CRI (Container Runtime instance)
iv)CAdvisor-
CAdvisor is an open-source agent integrated into the kubelet binary that monitors resource usage and analyzes the performance of containers.
v)Pods-
Pods are the smallest, most basic deployable object in k8s. Pods contain one or more containers, such as Docker containers. When a Pod runs multiple containers, the containers are managed as a single entity and share the Pod's resources.
This is the Architecture of Kubernetes.
🔹Kubernetes Installation
1) Minikube – Virtualized Environment for Kubernetes
Step-1 Install kubectl
Go to this page https://kubernetes.io/docs/tasks/tools/
Select your OS according to that follow installation steps
Install and Set Up Kubectl on Windows
Install kubectl binary with curl on Windows
curl.exe -LO "https://dl.k8s.io/release/v1.27.0/bin/windows/amd64/kubectl.exe"
Validate the binary (optional)
Download the kubectl checksum file:
curl.exe -LO "https://dl.k8s.io/v1.27.0/bin/windows/amd64/kubectl.exe.sha256"
Validate the
kubectlbinary against the checksum file:Using Command Prompt to manually compare
CertUtil's output to the checksum file downloaded:CertUtil -hashfile kubectl.exe SHA256 type kubectl.exe.sha256Using PowerShell to automate the verification using the
-eqoperator to get aTrueorFalseresult:$(Get-FileHash -Algorithm SHA256 .\kubectl.exe).Hash -eq $(Get-Content .\kubectl.exe.sha256)
Append or prepend the
kubectlbinary folder to yourPATHenvironment variable.Test to ensure the version of
kubectlis the same as downloaded:kubectl version --client
Then we need to install Minikube
minikube Installation
go to this page https://minikube.sigs.k8s.io/docs/start/ according to your os follow the installation steps.
To install the latest minikube stable release on x86-64 Windows using .exe download:
- Download and run the installer for the latest release.
Or if using PowerShell, use this command:
New-Item -Path 'c:' -Name 'minikube' -ItemType Directory -Force Invoke-WebRequest -OutFile 'c:\minikube\minikube.exe' -Uri 'https://github.com/kubernetes/minikube/releases/latest/download/minikube-windows-amd64.exe' -UseBasicParsing
- Add the minikube.exe binary to your PATH.
Make sure to run PowerShell as Administrator.
$oldPath = [Environment]::GetEnvironmentVariable('Path', [EnvironmentVariableTarget]::Machine) if ($oldPath.Split(';') -inotcontains 'C:\minikube'){ [Environment]::SetEnvironmentVariable('Path', $('{0};C:\minikube' -f $oldPath), [EnvironmentVariableTarget]::Machine) }
2 Start your cluster
From a terminal with administrator access (but not logged in as root), run:
minikube start
It will create VM first on top of this vm it will create single node k8s cluster.
In a real-time scenario in production, we will use a multi-node k8s cluster. In High Availability in general 3 master and n number of nodes.
Minikube is a demo cluster, a test cluster so it just creates one vm on top of it and runs a single node k8s cluster.
2)Kubeadm – Bare metal installation
- Set up your EC2 instance:
Launch an EC2 instance with Ubuntu 20.04 AMI and assign a security group that allows incoming traffic on TCP ports 22, 80 and 6443.
- Set up your environment:
Connect to your EC2 instance using SSH and ensure that Docker is installed:
sudo apt-get update && sudo apt-get install -y docker.io
Disable swap:
sudo swapoff -a
Configure the firewall:
sudo ufw disable
- Install kubeadm:
sudo apt-get update && sudo apt-get install -y apt-transport-https ca-certificates curl
curl -s https://packages.cloud.google.com/apt/doc/apt-key.gpg | sudo apt-key add -
echo "deb https://apt.kubernetes.io/ kubernetes-xenial main" | sudo tee /etc/apt/sources.list.d/kubernetes.list
sudo apt-get update
sudo apt-get install -y kubelet kubeadm kubectl
- Create a configuration file:
cat <<EOF | sudo tee /etc/kubernetes/kubeadm-config.yaml
apiVersion: kubeadm.k8s.io/v1beta2
kind: ClusterConfiguration
kubernetesVersion: stable
controlPlaneEndpoint: "MASTER_IP:6443"
networking:
  podSubnet: POD_NETWORK_CIDR
EOF
Replace MASTER_IP with the private IP address of your master node, and POD_NETWORK_CIDR with the CIDR range for your pod network (e.g. 10.244.0.0/16).
- Initialize the control plane:
sudo kubeadm init --config=/etc/kubernetes/kubeadm-config.yaml --upload-certs
This will initialize the Kubernetes control plane on the master node, and print out a command for joining worker nodes to the cluster.
- Set up kubectl:
Copy the kubeconfig file to your user directory:
mkdir -p $HOME/.kube
sudo cp -i /etc/kubernetes/admin.conf $HOME/.kube/config
sudo chown $(id -u):$(id -g) $HOME/.kube/config
- Join worker nodes:
Run the join command on each worker node to join it to the Kubernetes cluster:
sudo kubeadm join MASTER_IP:6443 --token TOKEN --discovery-token-ca-cert-hash SHA256:HASH
Replace MASTER_IP with the private IP address of your master node, TOKEN with the token generated during initialization, and SHA256:HASH with the certificate hash generated during initialization.
- Set up networking:
Set up networking for your Kubernetes cluster, using a plugin such as Calico or Flannel.
- Deploy your applications:
Use kubectl to create Kubernetes objects like pods, services, and deployments, and deploy your applications:
kubectl create deployment nginx --image=nginx
kubectl expose deployment nginx --port=80 --type=NodePort
With these steps, you should now have a fully functional Kubernetes cluster running on EC2 instance.
Connect me on
LinkedIn: https://www.linkedin.com/in/aditya-tak/
Hashnod: https://hashnode.com/Aditya Jagdish Tak
#Kubernetes #Devops #Kubeweek #kubeweekchallenge

